Learn how a Logo Design turned into a Headphone Stand.
˙Sandeep Sura – “Creativity is about seeing the familiar in new ways and turning ideas into simple realities.”
[Approx; 10 minute read]
I've just completed an exciting logo design project and I'd like to share some insights with you. In this article, I will delve into my creative process and the valuable lessons I gained while integrating 3D modeling with functionality.
Project Overview
Client’s Company: Frame Blend Post
Industry: Film and TV / Post-production
Specialization: VFX, Color Grading, and Audio Mastering
Task: Logo Design
…
From concept to prototype, this video showcases the whole journey.
1. Research: Client Category and Services
To ensure a thorough understanding of Frame Blend Post’s industry and services, I researched the VFX, Color Grading, and Audio Mastering process. This research helped me identify key trends, common design elements, and the competitive landscape - this deep understanding provided a solid foundation for the design process.
TOP TIP: Go beyond desktop research! Engage with the client and other professionals. Use the tools of the Industry yourself to gain firsthand insights into the craft.
2. Finding a Direction
For this project, I started by unraveling the meaning behind the company name and looking into how it dovetailed back into the services.
Frame - represents the still images that make up a moving picture.
Frame Blend - a technique used to create smooth transitions between video frames.(Eg. A slow motion effect)
Post - indicates that all the services are done after shooting the footage.
3. The Design Direction
Before settling on a direction, I explored three possible routes for the logo design.
A. Literal icons
B. Abstract symbols
C. Acronyms
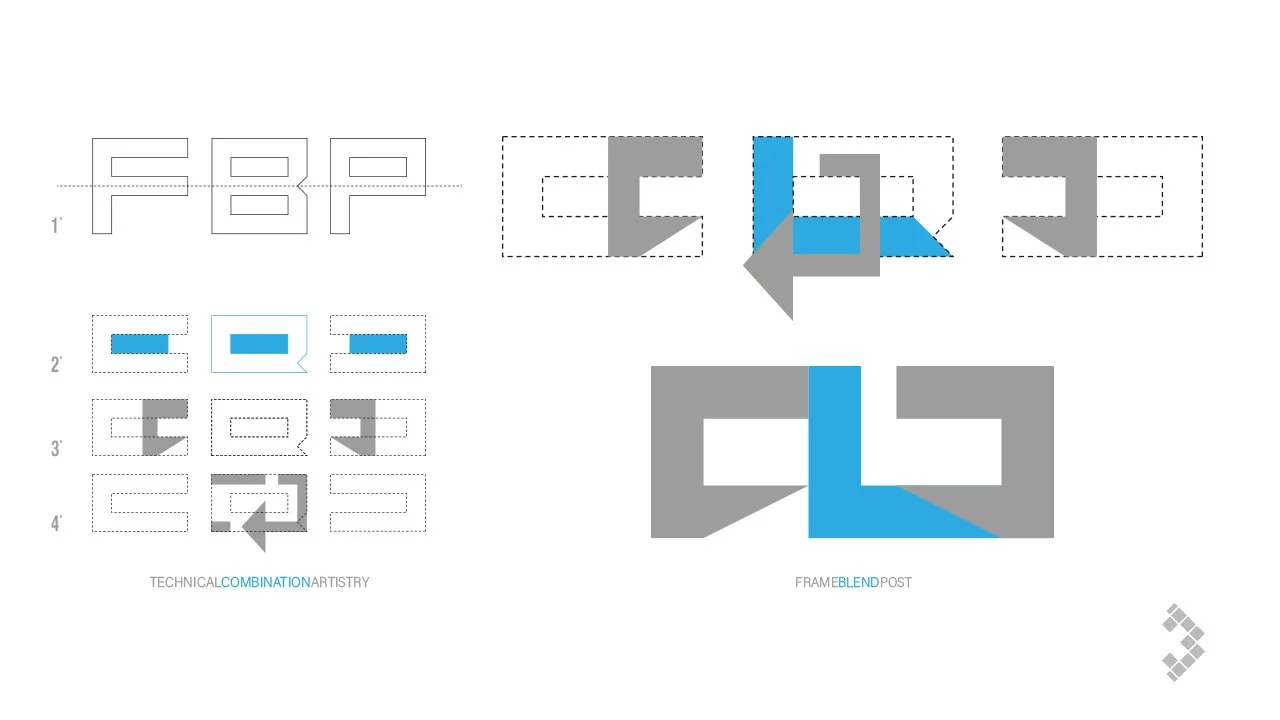
While comparing all of the above, I noticed that the first letters - F, B, and P - all had a window shape similar to a film frame. I then started to look for fonts that mirrored this shape. I finally settled on the font - Android 101, which I used as a base for my design. With the help of some custom grids I played around with the shapes and created stylized letters for F and P.
4. The Creative Twist
The word "Blend" needed more than just a simple "B" placed in the middle of the letters; it needed to hold meaning and make the design more cohesive. While I felt confident that the stylized F and P captured the artistic side of the business, I also wanted to incorporate a technical element. Revisiting my notes, I discovered a commonly used button in the client’s applications - the loop button, which has a “b” shape in the negative space. Inspired by this, I incorporated the same “b” shape into the logo, which also forms an upside-down “p,” perfectly representing the "Blend" aspect of the name.
5. Steps to Finalise the Logo
Once I had the basic structure of the logo, I took it through these stages:
A. Refining the Logo
B. Testing across different mediums and sizes
C. Exploring color combinations
D. Creating a presentation deck
E. Presenting to the Client
TOP TIP: Share your thought process at every stage. Clients value the transparency and it helps them give objective feedback.
This video is all about practical production insights for 3D Projects.
6. Bringing the Logo to Life
Once the logo was finalized, I began exploring ways to make it functional. This included:
A. Finding inspiration online
B. Watching numerous YouTube videos
C. Immersing myself in the world of building and 3D design
I’m not kidding - I watched countless furniture-building tutorials!
From all this research, one thing became clear: I wanted the client to use this object every day. Remembering the client's passion for audio, I associated audio with headphones - a common piece of equipment in their industry. By revisiting the logo, I realized the letter "F" could be turned into a hook for the headphones. This idea sparked the journey of turning a visual design into a practical object and took me through the following process:
A. Finding a 3D Printer Supplier:
I settled on a local supplier to reduce shipping time, cost, and ease of communication. This choice also allowed for closer collaboration throughout the printing process.
B. Modeling Specifically for Print Purposes:
The nuances required for 3D printing differ significantly from concept design. I had to adjust the logo to ensure it was structurally sound and practical for everyday use.
C. Lessons Learned:
Avoid Overhangs and Bridges: I learned to use tapered structures with 45-degree angles to enhance stability, preventing issues with sagging or collapse during printing.
Allow for Tolerances: It’s important to allow for tolerances between parts, considering factors like printer accuracy, material properties, and thermal expansion. For instance, leaving a tolerance ensured the pieces fit together precisely.
Incorporate Mating Holes: Adding mating holes for aligning 3D pieces proved essential during assembly. These holes allowed for accurate gluing and secure connections.
TOP TIP: Collaborating closely with production experts not only refines your technical execution but also opens your mind to new possibilities!
…
In Conclusion…
This project with Frame Blend Post was a rewarding journey that demonstrated how integrating 3D modeling with functional design can elevate a brand’s identity. By combining thorough research, creative ideation, and practical application, I was able to transform a static logo into a dynamic and functional 3D object. The process underscored the importance of understanding the client’s industry, exploring various design directions, and collaborating closely with production experts.
I hope these insights and tips inspire you to approach your next project with renewed creativity!
#DesignProcess #LogoDesign #3DModeling #3DPrinting #TripleThink
…
Bonus Material
1. Learn how this LinkedIn video was filmed: step-by-step. (Part 1 and 2): Click here to watch on YouTube
2. Learn about the two lighting techniques used for this video: Click here to watch the video on YouTube
Thank you for taking the time to read my blog! I’d love to hear your thoughts - please leave a comment below.


